What’s the definition of holiday? For me it’s doing absolutely nothing, but doing “nothing” is something I’m not very good at. Endless stretches of time with no planned activities seem foreign and somehow scary. It’s as if my existence has been defined by moving from one task to the next, and when the lists have been completely checked off, well, it’s downright strange. But I’m going to take this moment of downtime to have a cup of coffee and watch the first real snow come down outside the kitchen window. The cardinals are eating seed and breadcrumbs on the back porch, and the steamed pudding is simmering away on the stovetop; the house starting to smell like Chinese Five Spice powder and nutmeg. Another Christmas has gone. We did it! We made it through another one!
I often wonder how it is things became so hectic during the month of December. I suppose it’s the growing number of connections we make in our life, and this is the one moment of the year when it’s safe to recognize them in the form of cards and gifts. My favorite gifts are obviously the baked kind, and I have spent no small amount of time in the kitchen this past week getting all the goodies made, packaged and tied with pretty ribbons. It would be easier if the baking could be spread out a bit instead of trying to make everything Christmas week, but freshness is key when it comes to many cookies and cakes. The other key is to make any freezable dough in advance and then tackle one cookie (or other baked treat) every evening.
This year I wanted to make many of the same cookies from years past because of their success and the tradition now being paired with baking them. I’ve started to get a few requests here and there, and honoring them is very important. Finding a favorite cookie my friends like and baking them with a little sugar, spice and love is my definition of a fantastic gift. Some people like gingerbread and some Mexican Wedding Cakes (cookies) and others always seem to fall for the sweet and savory combination of the Rosemary Butter Cookies.
As many of you bakers out there know it can get a little boring making the same old cookies year after year…especially those of you with an experimental side. It can be a little intimidating to start messing with quantities of recipe ingredients, proportions and flavor changes in an effort to “change things up”, it can also lead to a different kind of cookie altogether (which isn’t necessarily bad), but as I discovered this year the presentation of the same old cookie can really make a difference in taking the repetition out of the holiday bake-a-thon. Change a few cookie cutters, change out the packaging and you have a recipe for a new and brilliant spin on holiday dessert gifts.

Panettone, I discovered, are essentially large loaves of brioche studded with candied orange peel, bittersweet chocolate, and some crunchy almonds and sanding sugar on top. You make the batter like any other yeast bread and let it proof. After an hour or so it has doubled in volume. The dough goes in the fridge overnight and the next day it’s just a matter of portioning the dough into the panettone molds, letting them come to room temperature, rise and then bake! Once they are done, you hang them upside down via wooden skewers run through the bottom of the loaves, suspending them between a couple of old paint cans (or coffee cans) to keep them light and airy. People who don’t like either panettone or fruitcake told me how much they enjoyed this bread. If that isn’t a Christmas miracle, then I don’t know what is.
After the success of the breads it was time to move onto the cookies. I often do sugar cookies as holiday gifts, but after the cookie competition a few weeks ago I didn’t think I could look at another sugar cookie for a while. Instead I decided to move Mexican Wedding Cakes into their slot. My friend Randall loves these cookies. She requested them both last and this year, so I could hardly say no, and these cookies are very easy to make as well. I posted this recipe last year in the December section of the blog, but I’ll repost it here since Martha still doesn’t have the recipe online…unless you have her new cookie app for the iPad (which I highly recommend getting…it’s beautiful and very functional):
“Turning once more to Martha Stewart’s Baking Handbook, I quickly made up a batch to take to dinner. I looked on Martha’s website for this exact recipe but was unable to find it. I will reprint it for you here in case you take a notion to make these airy, nutty cookies:
Mexican Wedding Cakes
1 cup pecan halves
2 cups confectioner’s sugar
2 cups all-purpose flour
1/4-teaspoon salt
2 sticks unsalted butter, room temperature
1-teaspoon pure vanilla extract
1-teaspoon pure almond extract
Preheat the oven to 350 degrees
Combine nuts and 1/4 cup of the confectioner’s sugar in a food processor. Finely grind. Combine this mixture with the flour and salt; set aside.
In the bowl of an electric mixer (with paddle attachment) beat together butter and 3/4 cup of confectioner’s sugar on medium speed until light and fluffy, about 4 minutes. Make sure to scrape down the bowl periodically; then add in both extracts and finally the flour nut mixture (on low so you don’t get flour everywhere). Mix until the dough just comes together. You know how I feel about over-mixing.
Roll the dough into 3/4-inch balls and place on parchment lined baking sheets…you can get about 15 cookies per sheet, and bake for 10 to 12 minutes. The tops will still be pale, but the underside will be golden. After they cool, roll them in the remaining cup of confectioner’s sugar. It’s that easy.”
These cookies keep for the least amount of time, so I suggest getting them into airtight containers as soon as they are cool. After a few days they become a little crisp and biscuit-like…not necessarily bad, but not the light and delicate texture they possess when they are fresh.
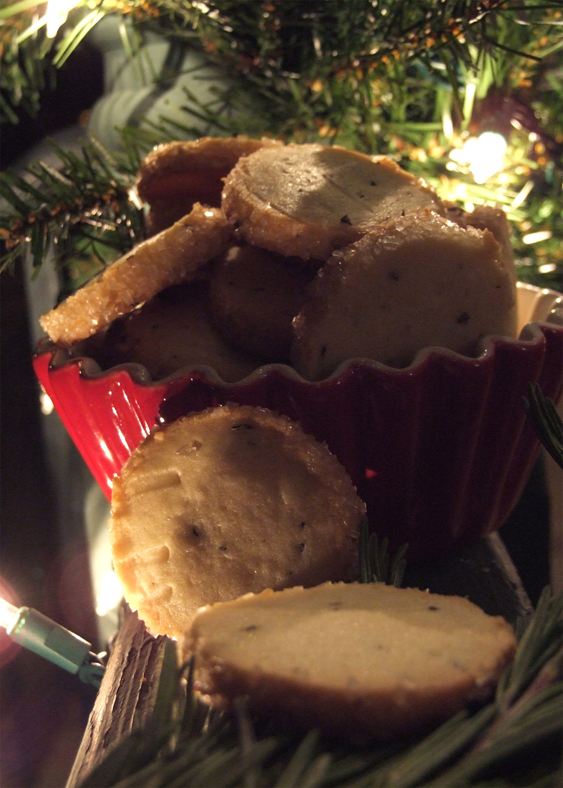
My plan had been to get the Mexican Wedding Cakes made as well as the dough for both the Rosemary Butter Cookies and the Gingerbread so I could bake them off on weeknight evenings, but AMC was having a old movie marathon of some of my favorites such as the 70’s version of A Christmas Carol affectionately known as Scrooge, starring Albert Finney and Alec Guinness. It’s a musical version and the one I remember watching over and over as a kid. Scrooge got me through the first round of baking and dough making then another favorite came on: my beloved Auntie Mame. Every young man I know always wanted an Auntie Mame, and every time Rosalind Russell comes on screen and transforms her nephew Patrick’s life into a world full of frivolity and colorful scenarios I have to stop and watch (and get a little teary eyed). I figured while I watched television I might as well start baking the rosemary cookies and have them finished up as well. The Rosemary Butter Cookies are a perennial favorite because of their sweet and saltiness paired with the wintry and what I dub “Christmas tree-like” flavor. They are great on a dessert buffet, they are great with a cup of coffee or tea in the afternoon, they are a versatile and lovely cookie and so simple to make. It’s only a matter of mixing up the dough and rolling it into a couple of “logs” that get wrapped in parchment and placed in the freezer for about an hour until firm.
Once you pull them out and unwrap them, the only thing left to do is brush with an egg wash and roll in sanding sugar. Slice to a quarter of an inch thick and bake for about 12 minutes at 375 degrees until golden. Again, it’s good to get these into an airtight container as soon as they are cooled and leave them there until you are ready to package for Christmas. In contrast to the Mexican Wedding Cakes, these get a little better over time in my opinion and will keep for a good 4 to five days without much trouble.
After Auntie Mame saved Patrick from making a horrible mistake and marrying a conservative snoot of a girl it was time for the Gingerbread cookies. Every year I make snowflake shaped gingerbread with royal icing. They are very pretty and a nice shape to do some simple piping work: a graphic look with some lovely dragees, clean and simple. But I also wanted to try and stretch myself a bit. On one of my many runs to Sur la table over the season I found a beautiful copper cookie cutter of a chubby gingerbread man. As I have mentioned in the past, I don’t usually get into the flooding and decorating techniques called for on many cookies because of the time it can take, but I was feeling in a very spirited and creative mood this year so I went for it…and I found some pre-packaged colored frostings in containers with piping caps.
Royal icing is basically water and confectioner’s sugar and some cream of tartar. I figured buying the pre-made version of these wouldn’t be such a bad thing because it’s hard to “mess up” so few ingredients…and I was right. I found the icings also at Sur la table made buy the same company, Wilton, making the small holiday cutters I used on the sugar cookies a couple of weeks ago. All you have to do is heat the icing in the microwave for a few seconds and begin piping.
The gingerbread men were very cute and slightly deranged when complete. I don’t know about you, but when you add eyes to a humanoid shaped cookie, it starts to take on a strange and otherworldly characteristic (or maybe I’ve watched too many movies about inanimate objects coming to life). These little guys became either cute or creepy based on the placement of the eyes as well as the painted shape of the mouths. I used gold luster dust to create the mottling on the bodies as well as their expressive lips frozen in joyous, stern or crazed expressions. I loved them!! I was inspired to do a little Tim Burton lighting effect with an old strand of holiday lights shot on a black background. I ended up having a lot of fun with these guys and I think you will too.
Pardon me for a moment…it's time to check on the steamed pudding once more. I'm updating the cooking method used in my cousin’s great-grandmother's recipe, I’m steaming it in a large soup pot on the stove instead of in an old kettle placed on a stone in the middle of a roaring fire…the recipe is quite old. It’s important to maintain a certain amount of liquid in the pot; it should come halfway up the side of the mold during the 3 hours of steaming time. I find it handy to keep a teakettle on another burner and periodically bring water to a boil and pour it into the pot to maintain the water level.
 The snow is really coming down outside. I think they were forecasting our first “blizzard” of the season and I don’t mind since it’s only a day after Christmas. It helps keep the festive mood alive. Now where were we, oh yes, deranged gingerbread. Again, I can never seem to find the exact recipe online for the Gingerbread Men. This is another Martha Stewart’s Baking Handbook recipes and I’ll reprint it here because I really like it…it’s hard to find just the right gingerbread recipe and I think this one is it because of the fresh grated ginger:
Gingerbread Men
3 1/2 cups all-purpose flour, plus more for dusting
1 1/2 teaspoons baking soda
1/4-teaspoon salt
1 1/4 teaspoons ground cinnamon
1 1/4 teaspoons ground ginger
1 1/4 teaspoons ground allspice
1/4-teaspoon ground cloves
2 sticks unsalted butter, room temperature
3/4 cup granulated sugar
3/4 cup packed dark-brown sugar
1 tablespoon plus 1 teaspoon grated, peeled fresh ginger
1 large egg
1/4 cup unsulphured molasses
Royal Icing
In a large bowl, whisk together flour, baking soda, salt, cinnamon, ground ginger, allspice, and cloves; set aside.
In the bowl of an electric mixer fitted with the paddle attachment, beat butter, both sugars, and fresh ginger on medium speed until light and fluffy, 2 to 3 minutes, scraping down the sides of the bowl as needed. Beat in egg and molasses to combine. With mixer on low speed, gradually add the flour mixture, beating until just incorporated. Turn out the dough onto a clean work surface. Divide in half, and shape into flattened disks; wrap each in plastic. Refrigerate at least 1 hour or overnight.
Preheat the oven to 350 degrees, with racks in the upper and lower thirds. Line two large baking sheets with parchment paper; set aside. Remove dough from the refrigerator, and let stand until slightly softened. (This will help keep the dough from cracking when rolled.) On a large piece of parchment paper lightly dusted with flour, roll out dough to about 1/4 inch thick. To prevent sticking while rolling, occasionally run a large offset spatula under dough, and add more flour. Place parchment paper and dough on another baking sheet; freeze until very firm, about 15 minutes.
Remove dough from freezer; working quickly, cut out with large cookie cutters. (If the dough begins to soften too much, return to the freezer for a few minutes.) Using a wide metal spatula, transfer cutouts to prepared baking sheets; chill until firm, about 15 minutes.
Bake, rotating sheets halfway through, until cookies are crisp but not darkened, 12 to 15 minutes. Transfer parchment and cookies to a wire rack to cool completely. Decorate as desired with Royal Icing, if using.
I found decorating with a combination of the royal icing and sanding sugar made for a pretty flocked effect. The key to getting the look you are after is to decorate in steps. I first did they white icing and let it dry before using the colored icing. With the colored icing still wet, the sanding sugar sticks to it, but doesn’t stick to the dried white icing. It’s a lovely and simple technique and I was very pleased with my gingerbread psychopaths in the end.
Having done all the cookies on the same day, similar to the way that all 3 spirits visited Scrooge in one night, I was done with my cookies and ready for presentation and gifting! I love the packaging aspect of the holidays. I really get into present wrapping and ribbons, and this applies to making the cookie packages as well. This year I used simple cookie packages I found at the store with decorated cardboard bases and plastic bags. With the colorful cookies inside, a homemade ornament and a brightly colored ribbon to complete the look I can’t think of anyone who wouldn’t be happy to get one of these presents. The best thing is that the only money spent is on ingredients, and the gift only requires time spent doing something I already love…primarily baking.
I ended up making about 14 dozen cookies this year. Many went to packaged gifts, quite a few to work and the others were kept for a Christmas Eve party we had at our house this year. It was a small gathering of Ossining families and our friend Kassi came up from the “big” city. It was such a different experience because there were babies here! Both Finn and Mia were here with their parents, excitedly looking around at the Christmas tree and colored packages hanging out underneath. It got me that much more excited for our daughter to get here.
It’s been pretty crazy because Siena could come at any time. Her due date is January 11th, but she could decide to come at any moment now. My goal was to get through the holidays (and all it entails) before she came and so far so good (as if I have any control over that). I really hope she doesn’t come until January because of the proximity to Christmas. I know there are many folks out there who have birthdays close to the holiday and feel like it takes away from their other special day.
It’s strange to have Christmas Day over and done with. So much planning and activity go into making the day special…so much decorating, wrapping, buying and baking that seems like it will never end…and suddenly it’s done and we’re left with a beautiful memory and a sense of loss mingled with exhaustion.
Christmas Eve is my favorite day of the year, purely because anticipation is at it’s highest. On Christmas Eve everything is still possible. Santa may still bring you that special present, the dinner and desserts are still in a beautiful creative place in your mind and all the gifts you are giving are still the best ideas ever. I’m a big fan of anticipation because before the special moment or day arrives anything is possible and in that possibility is every hope imaginable.
We’ve been living through a lot of anticipation lately waiting for the baby to arrive. Lots of people asking if we are excited, which seems appropriate, but the honest answer is we are just ready to be done with the waiting. Whether it’s excitement or nervousness at this point I’m ready to stop speculating on what it’s like to be a parent and see what it feels like. I’m ready to be out of my thinking brain and into feeling and doing. It’s sort of like being at a cookie buffet that’ isn’t quite set-up. I’m ready for it to be done so I can eat already!!! Maybe a bad analogy because I don’t want to eat my young, but if you’ve had kids I think you know what I’m saying.
So now I will sit and let the steamed pudding come to fruition. It has one more hour of cooking in the pot before I dare to release the lid of the mold…always a scary thing. Steamed puddings are difficult only with regard to getting them out of the mold in one piece. You absolutely must, must, must thoroughly butter the inside of the mold and then spray it with vegetable spray to boot. This really ups your chances of getting it out with all the details intact. So I will leave you with one last recipe for the Christmas holiday, one that came from (as I mentioned earlier), my cousin’s great-grandmother, Mrs. Henson. The only special equipment you’ll need is a steamed pudding mold and a large stockpot, unless you have a stone hearth with which to get a good roaring fire going and a giant lidded cauldron. The recipe is as follows:
Steamed Christmas Pudding
1 stick butter (at room temperature)
1 1/2 cups brown sugar tightly packed
2 eggs
1-teaspoon vanilla
1 cup peeled grated carrots
1 cup peeled grated apples
1/2-cup raisins
1 cup coarsely chopped pecans
1 cup sifted flour
1-teaspoon baking soda
1/2-teaspoon salt
1/4 teaspoon Chinese five spice powder (my addition)
1/4-teaspoon allspice (my addition)
1/4-teaspoon ground cardamom (my addition)
1/4 teaspoon freshly grated nutmeg (my addition)
1 cup dry fine white bread crumbs
 Sift together the dry ingredients: flour, baking soda, salt and spices in a medium sized bowl.
Combine the butter and sugar in a stand mixer; beat on medium high for 3 to 4 minutes. Add in eggs one at a time followed by the vanilla. Slowly add dry ingredients and mix until just combined. Add carrots, apples, raisins, pecans and breadcrumbs. Mix on low until everything is incorporated.
Pour the batter into the prepared mold (severely buttered like I mentioned earlier) and put the lid on top. In a large stockpot, place a steamer insert in the bottom and top with a dishtowel. This will make a cushiony place for the pudding mold to sit while it’s steaming. The goal is to have the simmering water come halfway up the side of the mold, so depending on the size of your pot, the amount of water you need will vary. The goal is to bring the water to a boil, place your mold down in the pot on the dishcloth (water halfway up the side) then place a plate or some other dish on top of the mold to weigh it down. Put the lid on the stockpot and let it simmer for 3 hours. About every hour or so check the water level, and if you need more boil some in a tea kettle so you are adding hot water and not reducing the temperature of the water inside the pot. Once three hours are up, cross your fingers that you used enough butter in the mold and you will be rewarded with a beautiful pudding for your Christmas, Boxing Day or New Years Party.
I realize there are a lot of recipes in this blog installment, but I’m hopeful one or more of them will spark your interest not only for Christmas (aside from the gingerbread) but for other times of the year as well. All of them make wonderful winter treats your friends will love to eat and share, and that’s really what this time of year is all about. All of these things we do in the name of Christmas or other winter holidays is in service to seeing and celebrating with friends and family. It’s the ultimate reason I create Fabulous Pastries and hope that everyone enjoys them.
I’m not sure when I’ll be able to give birth to another posting. It could be next week or a couple of months from now depending on when Siena decides to make her appearance. Until then I hope you all have a wonderful holiday season, a happy New Year and a kitchen full of sugar laced memories. It’s just who I am.


 The snow is really coming down outside. I think they were forecasting our first “blizzard” of the season and I don’t mind since it’s only a day after Christmas. It helps keep the festive mood alive. Now where were we, oh yes, deranged gingerbread. Again, I can never seem to find the exact recipe online for the Gingerbread Men. This is another Martha Stewart’s Baking Handbook recipes and I’ll reprint it here because I really like it…it’s hard to find just the right gingerbread recipe and I think this one is it because of the fresh grated ginger:


 Sift together the dry ingredients: flour, baking soda, salt and spices in a medium sized bowl.


No comments:
Post a Comment