Saturday, January 15, 2011

Induction Baking


Convection, induction…whatever, we’re having this baby!!!  Finally, we got the much anticipated call, the call that says “hey, come on down and let’s have this baby”.  Well, not exactly like that, but that’s what it feels like, like we finally got chosen to go on the game show and win a million dollars…or a million dirty diapers as the case may be.

We are headed to Pennsylvania tomorrow and inducing on January 16th 2011.  Seems like a good day to be born to me.  I’ll take it!  The wait of the past week and a half, well nearly three years to be more precise, has been driving us over the edge.  Each day Brian and I get up wondering if “this will be the day” or “where will we be when we get the call?” and end up filling the day with a series of unplanned activities be it home projects, trips to the gym, shopping and for me cooking and baking.  I find it extremely humorous that we were at a P.F. Chang’s, no less, and one connected to a shopping mall at that.  You don’t have to go very far outside of New York City to find your roots, and I always love “bad” Chinese food.

The last of the pre-baby Fabulous Pastries is in the oven, and it is a New York Style Crumb Cake by the owners of Baked in Brooklyn.  They recently came out with a new cookbook called Baked Explorations: Classic American Desserts Reinvented (it has gorgeous photos).  In the book, they are doing something I find to be rather interesting and something I’ve written about on several occasions; tracing or tracking down the origin of regional recipes and then giving it their own twist.  I love the research.  I’m very interested in knowing why something is made the way it is, whether that be in terms of flavor profiles or cooking styles.  Did it come from Grandma or Aunt Helen, or is it a recipe someone found in the newspaper, maybe even a recipe from the neighbors brought to a potluck dinner at the local church? 

How a recipe comes about and keeps its staying power (or fades away into the dust, sometimes for good reason) is intriguing to me.  I suppose it’s similar to fashion in a way.  Big shoulder pads left us for a reason and apparently desserts are no different.  If a dessert becomes extremely trendy, winding up on every menu in town, the intoxicating power and novelty wear off.  Rare items and hard to find gems are popular because of scarcity, and apparently so is a good chiffon cake or Boston cream pie according to the Baked guys. 

Dessert star power is a fickle thing, and so is tracing the birth of many of our most popular favorites.  Every region has something special to offer, ask any northerner where you can find good Red Velvet Cake and they should tell you to head south.  This book shares many interesting tidbits and facts about a range of desserts and sweet breakfast items.  Hilariously I even found a recipe for strawberry pretzel salad, a recipe found in my grandmother’s recipe box and one I made on this blog a long time ago…and yes, the origin is mid-western.  We do love our Jell-O salads.

Baked Explorations is one of the three cookbooks I happily received for Christmas.  The other two were both from the Barefoot Contessa.  An older one called Barefoot Contessa Family Style, and her latest book called Barefoot Contessa How Easy is That?…riffed from her trademark phrase.  In the past week and a half of being away from what I would call “work proper” I have found myself able to read multiple books (and play video games), a luxury I had been indulging in solely on the train to and from work.  I was able to sit down and properly explore all three cookbooks, making only Barefoot Contessa meals and dessert over the past weekend and saving Baked Explorations for this one.

Barefoot Contessa’s recipes are always so simple, or at least reasonably simple and accessible for most people.  There aren’t any crazy ingredients as a general rule, you know the kind you have to track down in an isolated village in some small European country only producing the particular item 1 month out of the year and if you don’t get it then you’re screwed…none of that.  I appreciate not having leftovers of specialty ingredients haunting my already overburdened pantry, and Ina seems to get it. 

In looking for inspiration for this week’s desserts I went back to my quest for seasonal and weather appropriate items.  When it’s cold and bleak out, I can think of few better things than a crumb cake from the Baked boys and Orange Pound Cake from Ina Garten. 

It is citrus season again…I guess it’s always citrus season if you go to any supermarket in the United States.  It’s rare that we, as a consumer of transported goods, can’t get any food item we want at most any time.  I’ve rambled on and on in the past about not wanting to eat a tomato in the winter (and that still holds true), but an orange in January is perfectly lovely, and recommended even. 

From December through March most citrus fruits are delicious and bursting with flavor and color.  Each year I purchase the requisite box of clementines from the market to place in a bowl by the front door as decoration and as an offering to guests.  There is something very clean and beautiful about a clementine, and most citrus for that matter.  Not only are they good for eating, but much like lemons can be used for cleaning and freshening the house as well.  The bowl in the hall never seems to empty, though.  I end up with about half the clementines eaten and another half drying out and left sitting sadly on the sideboard.  When I saw Ina’s recipe for the Orange Pound Cake, I immediately knew of a few orange related candidates I could put to good use. 

The recipe calls for the zest of six oranges plus additional juice to make the sauce and glaze that goes into the bread, but I discovered about 2 clementines equal the same amount of zest and juice as the large navel oranges, and the flavor seems a little brighter to me.  Yes, my hand got a little tired grating those bright orange balls of juiciness, but my conscience is free from guilt and the bowl in the hall is almost empty.  Here is the reprinted recipe from Barefoot Contessa Family Style:

Orange Pound Cake

1/2 pound (2 sticks) unsalted butter, at room temperature
2 1/2 cups granulated sugar, divided
4 extra-large eggs, at room temperature
1/3 cup grated orange zest (6 oranges)
3 cups all-purpose flour
1/2-teaspoon baking powder
1/2-teaspoon baking soda
1-teaspoon kosher salt
3/4 cup freshly squeezed orange juice, divided
3/4-cup buttermilk, at room temperature
1-teaspoon pure vanilla extract

Glaze

1 cup confectioner’s sugar, sifted
1 1/2 tablespoons freshly squeezed orange juice

Heat the oven to 350 degrees.  Grease and flour two 8 1/2 x 4 1/2 x 2 1/2 inch loaf pans.  Line bottoms with parchment paper.

Cream the butter and 2 cups of the granulated sugar in the bowl of an electric mixer fitted with the paddle attachment for about 5 minutes, or until light and fluffy.  With the mixer on medium speed, beat in the eggs, one at a time, and the orange zest.

In a large bowl, sift together the flour, baking powder, baking soda, and salt.  In another bowl, combine 1/4 cup of the orange juice, the buttermilk, and vanilla.  Add the flour and buttermilk mixtures alternately to the batter, beginning and ending with the flour.  Divide the batter evenly between the pans, smooth the tops, and bake for 45 minutes to 1 hour, until a cake tester comes out clean.

While the cakes bake, cook the remaining 1/2-cup of granulated sugar with the remaining 1/2-cup orange juice in a small saucepan over low heat until the sugar dissolves.  When the cakes are done, let them cool for 10 minutes.  Take them out of the pans and place them on a baking rack set over a tray.  Spoon the orange syrup over the cakes and allow the cakes to cool completely.

To glaze, combine the confectioners’ sugar and orange juice in a bowl, mixing with a wire whisk until smooth.  Add a few more drops of juice, if necessary, to make it pour easily.  Pour over the top of the cakes and allow glaze to dry.  Wrap well, and store in the refrigerator.

I figured a little sunshine in the shape of a naughty, citrus studded loaf of butter and flavor would be the best cure for all these winter blahs.  It snowed another foot or so this week, slowly making me feel like I’ve moved to Canada instead of New York State.  It’s not so bad since I have been able to stay in my kitchen up to this point, watching the garden turn into a crisp field of white, but tomorrow we will be on the move!


As my last act of contrition, if you will, I wanted to make the New York-Style Crumb Cake recipe from Baked Explorations.  As I read through the book this morning many things popped out at me, and I bought the ingredients to make several different recipes should time permit, but happily (in this case) it didn’t.  I had been reviewing a couple different desserts with orange as a component.  I’m a fan of sticking to a color story when it comes to writing and taking photos for the blog, but both the recipes I found containing orange are a little more time consuming than what I have to work with at the moment.  The third recipe I wanted to try was a little less time consuming and still fits in our winter spectrum of naughtiness because of the fragrant cinnamon (and nearly four sticks of butter).  I haven’t found the recipe online yet, so I’ll reprint it here:

New York-Style Crumb Cake

Crumb Topping Ingredients:

1 cup firmly packed dark brown sugar
1/2 cup granulated sugar
1/2-teaspoon salt
1 1/2 tablespoons cinnamon
1 cup (2 sticks) unsalted butter, melted and warm
2 1/2 cups all-purpose flour

Cake Ingredients:

2 1/2 cups all-purpose flour
3/4-teaspoon baking powder
1-teaspoon baking soda
1/2-teaspoon salt
12 tablespoons (1 1/2 sticks) unsalted butter
1 1/2 cups granulated sugar
2 large eggs
1 1/4 cups sour cream
1-teaspoon pure vanilla extract

Preheat the oven to 350 degrees F and position the rack in the center.  Butter the sides and bottom of a 9x13 inch pan.

Make the crumb topping.  In a medium bowl, stir together sugars, the salt, and cinnamon.  Add the melted butter and whisk until combined.  Fold in the flour until it is absorbed and set the mixture aside.

Make the cake.  Sift the flour, baking powder, baking soda, and salt together in a medium bowl.  Set aside.

In the bowl of a standing mixer fitted with the paddle attachment, cream the butter until it is completely smooth and ribbon-like.  Scrape down the bowl and add the sugar.  Beat the mixture until it starts to look fluffy.  Add the eggs one at a time, and beat until incorporated.  Scrape down the sides of the bowl and mix again for 30 seconds.  Add the sour cream and vanilla and beat just until incorporated.  Add the dry ingredients in three parts, scraping down the bowl before each addition, beating only until it is just incorporated.

Assemble the cake.  Pour the batter into the prepared pan.  Use your hands to scoop up a handful of the topping and make a fist.  The topping should hold together.  Break off in chunks and drop them over the cake.  Repeat to use all the topping.  Remember, the topping layer will look outrageously thick.

Bake the cake for 45 to 55 minutes, or until a toothpick inserted in the middle comes out clean.  Rotate the pan two times during the baking process.  Cool the entire pan on a wire rack for about 30 minutes before serving.

The cake will last for 3 days, tightly covered, at room temperature.


Smelling cinnamon floating out of the kitchen is a definite cold weather pleasure.  It starts in the fall with apples, makes it’s way in to the holiday spice cakes and cookies and now ends up in this coffee cake-like dessert.  I say “like”, because Matt Lewis (one of the authors) makes a big point to clarify the differences between coffee and crumb cakes, most notably being the crumb topping is thicker than the cake itself…truly, and isn’t the crumb topping the best part?  Also there are no nuts or swirling of batter in a crumb cake where there often is with coffee cakes.  Regardless, the thick cinnamon and brown sugar topping is heavenly, homey, comforting and just the right thing to go with a glass of milk or a hot cup of coffee on a cold winter’s morning/afternoon/evening.  

I think it’s good to leave the house smelling like cinnamon.  That way the cats won’t know we’re really away…or I can tell myself that.  And when friends come over to check on Stanley and Lily they will be greeted with the pleasant scent of gently spiced baked goods, ushering them in to feed two seemingly desperate cats wanting treats and gravy, stat!!!  And maybe when we get ready to come home, there will still be that faint aroma hanging out here, ready to welcome us back with a special treat of our own, our daughter.

I’m so happy to finally get out of my head and into the reality of having a baby.  I’ve watched so many close friends go through this process in the past year, at one point there were four babies in a four-month stretch.  I’ve seen a lot of drool, some dirty diapers, a lot of feeding, some crying and tons of laughter and looks of wonderment.  I can only read so many books, take so much advice and process “thinking” related things.  I want to feel what it’s like to be a dad, and if she’s good (or bad), I might bake her a cake or two or three along the way.  It’s just who I am.

Saturday, January 8, 2011

Winter White


I’ve just finished gobbling a scone as a reward for getting some exercise.  That makes perfect sense, right?  Well of course it does if you happen to have some scones lying around the house on a Saturday afternoon as I do.  The baking doesn’t end just because I’m on pins and needles waiting for the baby to come.  If I thought I was keeping myself busy before, well I may be outdoing myself now.

You know all those projects that never seem to get done around the house?  The one’s like reorganizing the closets and rearranging the cupboard and pantry?  They are now complete.  What is it about “waiting” that makes one get organized?  I suppose it’s the sensation of control, and control over something small and tangible when the big things seem nowhere near your grasp.  Bathrooms get a good scrubbing, clothing gets a “looking over” and apparently doorknobs get changed and bead board goes up in the bathroom courtesy of Brian.  I leave those sorts of things to him; blogging is a much safer activity for me…less power tools.

We had another reasonably large snow again this week, the sticky kind that is light and delicate and clings to the bushes and trees like the most glorious, sparkly outerwear.  The world seems robed in a magic of sorts and I felt compelled to get out of the house for a little while, take in some fresh cool air and clear my mind.  With only my trusty camera as a companion I walked once more to the nearby cemetery to take some photos and bathe in the stillness of the winter afternoon.

Walking down my street I notice a transformation has taken place.  Even the most uninteresting spaces and lots have become an exercise in beauty.  This kind of wet snow has the power to change.  A run down house gains the charm of an English Tudor at Christmastime.  Slender branches and dried mop heads of hydrangea casually dip from the white hats weighing down from above.  I don’t care for winter as a general rule, but if I have to contend with it, this is the kind of day I enjoy.

Going for a walk like this reminds me of being a kid out in the country, hopping over the barbed-wire fence and heading off through the snow covered field, past the run-down milk barn and out into the woods.  There is no moment or place of greater quiet than a hushed forest covered in snow.  No breeze sneaks into its heart, the occasional sound of a snap or crack can be heard from squirrels looking for their fall stash.  I used to go and sit quietly by a fallen tree, not too far from what my cousins and I called Pond #1 (because there were three ponds out in the woods and field).  There was something so safe about that wood, something that was extremely calming to me as a boy and something I long for as I get older.

The cemetery near our house is as close as I can get to that right now.  It may seem morbid that I wander off there when looking for an escape into solitude, but it’s within a five-minute walk and I hardly ever find anyone there.  There is no endless amount of metaphor which could be described in going to a graveyard in the “dead of winter”, but that’s not what I’m after.  I love those big old trees.  Covered in this specific type of snow their grandeur is multiplied times infinity.  Every angle, needle, branch and remaining brown leaf is outlined in splendor.  The dark wet branches against a stark, glistening white snow is glorious.  I know babies like to see black and white contrasting images and shapes early on, but maybe it’s a joy you never outgrow.

As I walked along the stream and up the hill into the oldest part of the cemetery, (the area with the largest of the trees) the architecture of the stones became beautiful graphic shapes lost in a bright field.  The firewood smoke of nearby chimneys spoke to a cozy Saturday afternoon of people filling their homes, not having to go out into the snowy environment.  After a week of being home I was excited to be out in the elements, smelling not only the firewood on the breeze but the fragrance of elderly pines.  Giant swathes of ground were covered in a needled carpet butting up to mounds of ice, and it was all waiting quietly for me to walk through.

The birds were the most active creatures in the yard.  As I meandered down paths and made my way through stones, powder would gently fall like pixie dust as they landed on a branch not too far from my head.  If ever there was a living winter wonderland, it is Dale Cemetery.  The creek has risen and is running with a gentle voice, carrying away the melted snows from the previous blizzard and waiting for another melting day to remove this one too.

I’m inspired by all the white.  If January were to have a color, it would undoubtedly be white, or maybe the most faint and pale icy blue.  I have a love of color, not only from my art background and daily work, but I remember being a kid and loving nothing more than a “64” box of Crayola crayons and I think it’s fun to take color as an inspiration for “coloring” a picture, painting a room or even as a jumping off point for baking.

I managed to get a couple of things made this week during all my “downtime”.  The first was Coffee-Spice Shortbread with Crystallized Ginger and the second were Raisin and Oat Scones.  These are both pale desserts and fitting for the white or golden off-white scheme this month would seemingly dictate.  I chose these recipes not only for their colors, but also for their simplicity.  I would consider both of these treats to be for the non-baker or someone who is starting out.

I know you are out there; those of you, who made read this blog for some entertainment but just look at the recipes, nod your head, smile and never once think about making them (mom, etc…).  But I’m here to get you pumped up and into the kitchen with these two fool proof, simple creations that don’t take more than 15 minutes to put together and don’t require the use of a mixer either.  Come on, does it get any easier?

The first is the shortbread, though I would venture to say that this becomes more like biscotti than shortbread (in my opinion) because it gets rather crisp.  It’s a recipe I found in the December 2010 Bon Appetit, but never got around to making until this week because I had so many holidays related items to accomplish.  After making so many breads and cookies I was looking for a little comfort and simplicity in the realm of baking, and shortbread usually does the trick.   (Quick item of note:  there is a typo in the online recipe...it should be only 2 cups of flour.)

Shortbreads are generally quite simple with few ingredients, though this one does break that mold a bit by the use of so many spices and accoutrement.  The only special equipment here is the use of a food processor.  All the ingredients go into it, a little pulsing action occurs and viola…the dough is done and ready to be put into removable bottom pans.  I used a tart ring and a fluted tart pan for mine (the recipe makes two batches), but any pan with a false bottom will do.  Most people have a cheesecake pan or angel food cake pan where they can take out the bottom…just clean out your pantry like I did and see what you find.  You may be shocked at what’s hanging out in there.  I know I was.

After the shortbread comes out of the oven remove it from the pans, slice and let cool before covering the pieces in a generous helping of icing made with water, vanilla and confectioners sugar.  Stick the pieces of crystallized ginger on top while the icing firms up and they will be locked into place.  Because of the ginger and coffee going on in these I think they make a great “breakfast” item, but if you can’t get past all that butter and sugar first thing in the morning they will go nicely with your afternoon coffee as well.

The “scone” recipe, and I have it in quotes for a reason, is another great breakfast, brunch or coffee accompaniment.  This isn’t a traditional scone recipe by any stretch of the imagination.  Normally you mix your ingredients together, similar to biscuits, and cut-in chilled butter at the end before forming and cutting out the scones.  In my opinion, what this recipe makes is more of a large “drop” cookie or a golden crust dumpling.  They are sweet and savory, and dare I say on the healthy side as well.  I found them in the January/February 2011 issue of Everyday Food, but haven’t yet found the recipe online.  I reprinted it here:

Raisin and Oat Scones

3/4-cup all-purpose flour
3/4-cup whole-wheat flour
2 teaspoons baking powder
1/2-teaspoon coarse salt
3 tablespoons packed dark-brown sugar
1/2 cup rolled oats (not quick-cooking)
1/2-cup raisins or dried cherries (I didn’t have either, so I used dried apricots)
2 teaspoons fennel seed (optional)
3 tablespoons unsalted butter, melted
1 large egg, lightly beaten
1-cup buttermilk

Preheat oven to 400 degrees

In a medium bowl, whisk together flours, baking powder, salt, brown sugar, oats, raisins, and fennel seed. 

In a small bowl whisk together butter, egg and buttermilk until combined, then add to flour mixture.  Stir until batter is evenly moistened (do not overmix).

Drop batter by 1/3 cupfuls, 2 inches apart, onto a parchment-lined baking sheet.  Bake until golden brown, 15 minutes, rotating sheet halfway through.  Let scones cool on a wire rack, 5 minutes.

As you can see, a very simple recipe to put together and practically foolproof.  I was in the kitchen for about 30 minutes total and was rewarded with a crisp and sponge filled dessert with which to refuel after my epic hike through the forest.  I’m kind of surprised at how good these things really are.  I was a little worried because they are a more “healthy” sort of dessert or breakfast item what with the wheat flour, oatmeal and very little sugar or butter.  The fennel or anise seed give a beautiful but subtle licorice flavor, which paired nicely with the apricots.  I think candied orange might also be really good in these.  I would also say if you aren’t going to use fennel because you don’t care for that flavor profile, a teaspoon of cinnamon would be nice as a replacement.

Well, I guess it’s back to home repairs and “waiting” for me.  It beats sitting, staring at the phone willing it to ring with every fiber of my being.  Any gal who ever waited for a boy to call in high school knows exactly the feeling I’m talking about…only this time it’s hopefully news of a baby coming into the world and not some jerk canceling on the night of the prom.  I really hope she comes soon; I need a good excuse to order takeout.  It’s just who I am.


Sunday, January 2, 2011

A Stollen New Year


Happy New Year from Fabulous Pastries!!!  Can it be 2011?  It seems such a strange year to me because I have no associations with it, meaning no movies named after it with evil spaceship robots and no particular end of the world predictions I can recall (Mayan or otherwise).  It’s just another year and somehow not just another year.

The fact that I still have a moment to sit down and write means the baby hasn’t come quite yet.  We now begin the real waiting portion of our program, if you will.  Brian and I have one more day of work before we begin our “paternity” leave and I hope Siena doesn’t take too much time after that to grace us with her presence.  The “waiting” is already becoming interminable.  Each day I have to find lots of things with which to fill my time (this isn’t a difficult task mind you) to keep from spinning my wheels round and round in my head wondering what life is going to be like after her arrival.

I’m sure it will be a shock to no one that baking is a great occupier of time for me.  Aside from shooting things with virtual guns on the Playstation 3, I can think of nothing more homey and relaxing.  There has been a recipe I’ve wanted to try for a couple of years now, a recipe for the German holiday bread called Stollen.  I first saw Martha Stewart and her mother making the yeasty bread on her old show from the 90’s…and every time I see the episode I think to myself “that’s a lot of work”.

I wasn’t sure I was going to make it through all my holiday baking activities with the pending bundle of joy, and I’d been kicking around the idea of making stollen when the panettone came along instead.  These desserts are quite similar in concept and general components, but very different in their flavor profiles because of proportions of ingredients.  Since the panettone came out so nicely, dispelling my fears over their baking process, I thought surely the stollen would come out good as well if I were patient. 

German bakers, particularly in Dresden, have been making this relatively savory bread since the 15th century.  It is beautiful as holiday bread because of the colorful array of dried fruits and nuts found inside, and looked like a rainbow of ingredients before being turned into the cohesive, golden loaf.  There were several things about making the bread that interested me, the first being candied citron.

I’ve never purchased or used citron before and never really even thought to look for it.  It’s a candied green rind of the fruit of the same name.  I guess I was drawn to its otherworldliness with regard to color.  Though I know green ingredients aren’t that uncommon, certainly limes and herbs notwithstanding, but there is something rather foreign to me about this fruit.   The alien nature (and attractiveness) may have been pushed over the edge for me when I went to try and purchase the stuff.

I went to Dean and Deluca, a gourmet foods store in New York City, because they commonly have unusual ingredients on hand most any given time, unless of course they are sold out because everyone else has been buying citron for their holiday baking.  I was not to be discouraged, though, I quickly jumped to the internet to do a Google search for citron in NYC and came up with an Indian/Middle-Eastern food market a mere block from one of the stops on the subway line I take. 

Kalustyan’s Market, on 28th street and Lexington Ave. is unlike any market I’ve ever been to.  I didn’t realize when I did my search that it was a Middle-Eastern market set in a small section of town full of similar restaurants.  I certainly wasn’t thinking of citron as an Indian specialty, and I don’t believe that it is, but the fruit did originate in and around Persian and Iran and has been a staple in some form or other since time was still written with B.C. in the title.  

The smells greeting me in the store were powerful, pungent, floral and earthy at the same time.  There were isles of glass containers featuring beans and rice of all different colors and varieties.  Spices were arranged along shelving in a colorful display next to jars and jars full of jams, chutneys and pickled items.  The most beautiful display of all had to be the nuts and dried/candied fruits.  There were very large, lidded glass vessels containing every vivid color imaginable of dried or brined foodstuffs.  The citron was most otherworldly suspended in it’s jar full of what I assumed to be seawater, the whole fruit cut in half and immersed in the preservative liquid, curing and waiting to be candied for all the world’s stollen recipes.  The iridescent yellow-green reminded me of pods from the movie Alien.  I felt like a creature was growing inside, seemingly an experiment gone wrong, but what a tasty experiment!

I’m not sure why they had the brining fruit on display, but it was certainly fun to look at.  Its candied counterpart was in a jar below next to the candied orange and lemon peels.  I took just enough for the stollen recipe and wandered around to look at the rest of the store.  I acquired the blanched almonds the recipe calls for as well as some candied orange peel and rose water to use at a later date.  I’ve seen recipes calling for rose water and always thought, “Where the heck to do you get that”?  And now I know, and as G.I. Joe always told us growing up, “knowing is half the battle.”

With ingredients in hand I was off to make my stollen.  From everything I’ve read, the bread is a traditional item on the sideboard for Christmas, generally had after the meal or as a breakfast item.  The name originally derives from a word meaning “awaken” and is considered the “early-rise” or breakfast bread.  I thought with Christmas being over already, maybe it could work it’s way into the New Year’s Eve festivities being planned by our good friend’s Andrea and Nathan.  I like the idea of “breaking bread” with friends, and what better night to do that than New Year’s Eve?

I got up on the morning of the 31st and was determined to give it my all and see if I could make the bread come out as prettily as it always does on television.  This recipe calls for shaping the dough into a cylinder, then trimming it every couple of inches to make segments.  The segments become a decorative part of the bread, giving it the appearance of a wreath.  Wreaths being the symbol for eternity (among other things such as status, power and ultimately giving way to the crowns royalty wear) seems an appropriately shaped and symbolic item to take to a New Year’s Eve dinner. 

The coming of the New Year has always been, for me at least, about rebirth and renewal.  I think for most people it’s a chance to feel like they can start over again in some way or begin a new project of sorts.  There is a clean feeling that comes with a new year.  It’s like the snow on the ground before a garbage truck or cab runs through it turning it black and mucky.  So while we can, let us eat the sugar dusted bread and feel “new” once more…or at least use it to soak up some of the champagne.

Now, where was I?  Oh yes, making the bread.  This recipe took about 5 and a half hours from start to finish, so it isn’t a quick one.  I wasn’t in the kitchen the whole time, but it’s time consuming because this being yeast dough needs to rise for two and a half hours for the first rising and about 45 minutes for the second.  Prepping the ingredients was the most time consuming.  There are quite a few of them and depending on what form you buy your fruit and nuts, a little chopping may be required. 

I followed this recipe to the letter aside from swapping out currants with cranberries.  I forgot to look for currants when I was at Kalustyan’s and didn’t end up finding them at my local grocery store.  I do love the sweetness of dried cranberries, though, and they seemed a festive substitute.  The cranberries got soaked in alcohol...the recipe called for cognac, but we had Scotch lying around the house and it seemed to work just fine.  The raisins get soaked in orange juice, and while the fruits are re-hydrating you have time to measure out all the dry ingredients and chop, zest and prepare any of the remaining items. 

This bread calls for two packages of yeast and 5 and a half cups of flour…it’s a lot of bread.  It makes very dense and heavy bread, hearty for serving on a cold winter morning or late drunken evening.  Apparently they have competitions in Germany to see who can make the largest and heaviest stollen, and throughout the centuries has been made large enough at times to feed entire villages via the invention of a giant, specialty oven for just this purpose.  I felt certain it would feed our crowd of ten for New Year’s.

Stollen does take some work, I wasn’t wrong about that.  This is bread made entirely by hand, no mixers allowed on this one folks.  The batter gets stirred together with a wooden spoon, then you add in the nuts, zest and fruits; this is when the kneading begins.  I kneaded for a good ten minutes before the dough lost most of its stickiness, and boy were my arms tired.  Kneading like that is something I never do, and from the way my upper arms felt after is clearly something I should be doing more.  Any way to burn calories while making food is a “good thing” in my opinion.

The dough does its first rise before being rolled out, rolled into a long cylinder and being placed in a ring shape on a parchment lined baking sheet.  Using kitchen scissors and cutting at 2-inch intervals, the wreath shape gets made.  After the bread rises a second time it’s baked for 45 minutes until golden and lovely, the house filled with the smell of toasted almonds and nutmeg.  A light dusting of confectioner’s sugar completes the picture and pairs beautifully with the snowy landscape outside from last week’s “blizzard”.

The party and the stollen were a great success.  Andrea and Nathan went all out, hosting a dinner party for 10 with an 8 month old in the house.  I was impressed!!!  The table was beautifully laid with lots of silver and sparkle, a party setting that was both welcoming and magazine-like (in the best possible way) to my trained eye, and a table I was happy and excited to sit down to.  We had an evening full of warm conversation, great food and talks of babies mingled with board game activities leading us into 2011 I can’t think of a better way to spend an evening or welcome baby New Year.  It’s just who I am.

Sunday, December 26, 2010

White (Day After) Christmas


What’s the definition of holiday?  For me it’s doing absolutely nothing, but doing “nothing” is something I’m not very good at.  Endless stretches of time with no planned activities seem foreign and somehow scary.  It’s as if my existence has been defined by moving from one task to the next, and when the lists have been completely checked off, well, it’s downright strange.  But I’m going to take this moment of downtime to have a cup of coffee and watch the first real snow come down outside the kitchen window.  The cardinals are eating seed and breadcrumbs on the back porch, and the steamed pudding is simmering away on the stovetop; the house starting to smell like Chinese Five Spice powder and nutmeg.  Another Christmas has gone.  We did it!  We made it through another one!

I often wonder how it is things became so hectic during the month of December.  I suppose it’s the growing number of connections we make in our life, and this is the one moment of the year when it’s safe to recognize them in the form of cards and gifts.  My favorite gifts are obviously the baked kind, and I have spent no small amount of time in the kitchen this past week getting all the goodies made, packaged and tied with pretty ribbons.  It would be easier if the baking could be spread out a bit instead of trying to make everything Christmas week, but freshness is key when it comes to many cookies and cakes.  The other key is to make any freezable dough in advance and then tackle one cookie (or other baked treat) every evening.

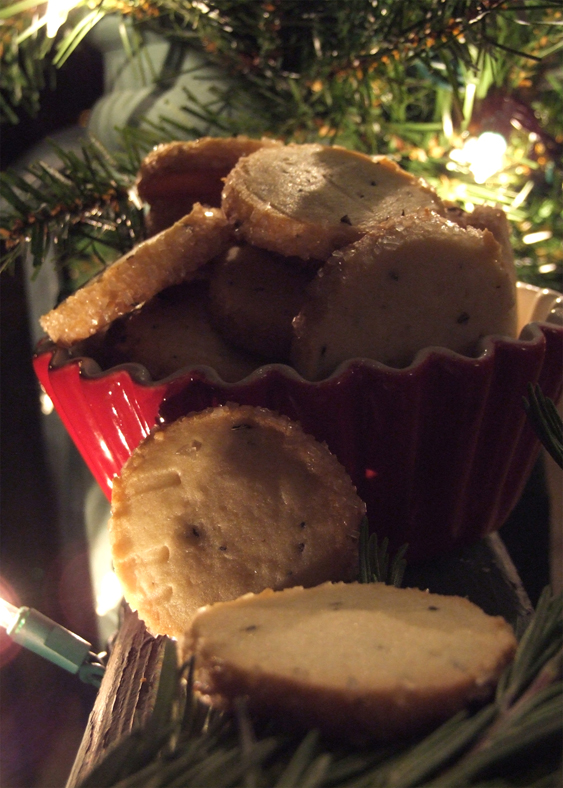
This year I wanted to make many of the same cookies from years past because of their success and the tradition now being paired with baking them.  I’ve started to get a few requests here and there, and honoring them is very important.  Finding a favorite cookie my friends like and baking them with a little sugar, spice and love is my definition of a fantastic gift. Some people like gingerbread and some Mexican Wedding Cakes (cookies) and others always seem to fall for the sweet and savory combination of the Rosemary Butter Cookies. 

As many of you bakers out there know it can get a little boring making the same old cookies year after year…especially those of you with an experimental side.  It can be a little intimidating to start messing with quantities of recipe ingredients, proportions and flavor changes in an effort to “change things up”, it can also lead to a different kind of cookie altogether (which isn’t necessarily bad), but as I discovered this year the presentation of the same old cookie can really make a difference in taking the repetition out of the holiday bake-a-thon.  Change a few cookie cutters, change out the packaging and you have a recipe for a new and brilliant spin on holiday dessert gifts.

My focus this year was on both cookies and breads.  I started off the week before Christmas by tackling a Panettone recipe.  For some reason this was one of those breads that lived in my head as horribly intimidating.  I’ve seen it made on television multiple times and always remember it being a lengthy process, but I’m here to dispel that myth.  It didn’t take any longer than any other bread recipe.  Maybe I was afraid of the yeast, though I’ve worked hard to walk through that fear and come out on the other side.  Maybe I was afraid of the candied fruit and worried it might be received as just some other old fruitcake…who knows?  What I found out for sure is that people love this bread, and it’s simple enough to make multiples to give out as gifts.  If you’ve spent many a night making, baking and decorating cookies you know that the simplicity of baking a loaf of bread is nothing in comparison to the multiple steps involved in cookie baking.  With a few paper panettone molds, some cellophane and a grosgrain ribbon, people may wonder whether you bought these at a local bakery down the street.

Panettone, I discovered, are essentially large loaves of brioche studded with candied orange peel, bittersweet chocolate, and some crunchy almonds and sanding sugar on top.  You make the batter like any other yeast bread and let it proof.  After an hour or so it has doubled in volume.  The dough goes in the fridge overnight and the next day it’s just a matter of portioning the dough into the panettone molds, letting them come to room temperature, rise and then bake!  Once they are done, you hang them upside down via wooden skewers run through the bottom of the loaves, suspending them between a couple of old paint cans (or coffee cans) to keep them light and airy.  People who don’t like either panettone or fruitcake told me how much they enjoyed this bread.  If that isn’t a Christmas miracle, then I don’t know what is.

After the success of the breads it was time to move onto the cookies.  I often do sugar cookies as holiday gifts, but after the cookie competition a few weeks ago I didn’t think I could look at another sugar cookie for a while.  Instead I decided to move Mexican Wedding Cakes into their slot.  My friend Randall loves these cookies.  She requested them both last and this year, so I could hardly say no, and these cookies are very easy to make as well.   I posted this recipe last year in the December section of the blog, but I’ll repost it here since Martha still doesn’t have the recipe online…unless you have her new cookie app for the iPad (which I highly recommend getting…it’s beautiful and very functional):

“Turning once more to Martha Stewart’s Baking Handbook, I quickly made up a batch to take to dinner.  I looked on Martha’s website for this exact recipe but was unable to find it.  I will reprint it for you here in case you take a notion to make these airy, nutty cookies:


Mexican Wedding Cakes

1 cup pecan halves
2 cups confectioner’s sugar
2 cups all-purpose flour
1/4-teaspoon salt
2 sticks unsalted butter, room temperature
1-teaspoon pure vanilla extract
1-teaspoon pure almond extract

Preheat the oven to 350 degrees
Combine nuts and 1/4 cup of the confectioner’s sugar in a food processor.  Finely grind.  Combine this mixture with the flour and salt; set aside.


In the bowl of an electric mixer (with paddle attachment) beat together butter and 3/4 cup of confectioner’s sugar on medium speed until light and fluffy, about 4 minutes.  Make sure to scrape down the bowl periodically; then add in both extracts and finally the flour nut mixture (on low so you don’t get flour everywhere).  Mix until the dough just comes together.  You know how I feel about over-mixing.

Roll the dough into 3/4-inch balls and place on parchment lined baking sheets…you can get about 15 cookies per sheet, and bake for 10 to 12 minutes.  The tops will still be pale, but the underside will be golden.  After they cool, roll them in the remaining cup of confectioner’s sugar.  It’s that easy.”

These cookies keep for the least amount of time, so I suggest getting them into airtight containers as soon as they are cool.  After a few days they become a little crisp and biscuit-like…not necessarily bad, but not the light and delicate texture they possess when they are fresh.

My plan had been to get the Mexican Wedding Cakes made as well as the dough for both the Rosemary Butter Cookies and the Gingerbread so I could bake them off on weeknight evenings, but AMC was having a old movie marathon of some of my favorites such as the 70’s version of A Christmas Carol affectionately known as Scrooge, starring Albert Finney and Alec Guinness.  It’s a musical version and the one I remember watching over and over as a kid.  Scrooge got me through the first round of baking and dough making then another favorite came on: my beloved Auntie Mame.  Every young man I know always wanted an Auntie Mame, and every time Rosalind Russell comes on screen and transforms her nephew Patrick’s life into a world full of frivolity and colorful scenarios I have to stop and watch (and get a little teary eyed).  I figured while I watched television I might as well start baking the rosemary cookies and have them finished up as well.

The Rosemary Butter Cookies are a perennial favorite because of their sweet and saltiness paired with the wintry and what I dub “Christmas tree-like” flavor.  They are great on a dessert buffet, they are great with a cup of coffee or tea in the afternoon, they are a versatile and lovely cookie and so simple to make.  It’s only a matter of mixing up the dough and rolling it into a couple of “logs” that get wrapped in parchment and placed in the freezer for about an hour until firm.

Once you pull them out and unwrap them, the only thing left to do is brush with an egg wash and roll in sanding sugar.  Slice to a quarter of an inch thick and bake for about 12 minutes at 375 degrees until golden.  Again, it’s good to get these into an airtight container as soon as they are cooled and leave them there until you are ready to package for Christmas.  In contrast to the Mexican Wedding Cakes, these get a little better over time in my opinion and will keep for a good 4 to five days without much trouble.

After Auntie Mame saved Patrick from making a horrible mistake and marrying a conservative snoot of a girl it was time for the Gingerbread cookies.  Every year I make snowflake shaped gingerbread with royal icing.  They are very pretty and a nice shape to do some simple piping work: a graphic look with some lovely dragees, clean and simple.  But I also wanted to try and stretch myself a bit.  On one of my many runs to Sur la table over the season I found a beautiful copper cookie cutter of a chubby gingerbread man.  As I have mentioned in the past, I don’t usually get into the flooding and decorating techniques called for on many cookies because of the time it can take, but I was feeling in a very spirited and creative mood this year so I went for it…and I found some pre-packaged colored frostings in containers with piping caps.

Royal icing is basically water and confectioner’s sugar and some cream of tartar.  I figured buying the pre-made version of these wouldn’t be such a bad thing because it’s hard to “mess up” so few ingredients…and I was right.  I found the icings also at Sur la table made buy the same company, Wilton, making the small holiday cutters I used on the sugar cookies a couple of weeks ago.  All you have to do is heat the icing in the microwave for a few seconds and begin piping.

The gingerbread men were very cute and slightly deranged when complete.  I don’t know about you, but when you add eyes to a humanoid shaped cookie, it starts to take on a strange and otherworldly characteristic (or maybe I’ve watched too many movies about inanimate objects coming to life).  These little guys became either cute or creepy based on the placement of the eyes as well as the painted shape of the mouths.  I used gold luster dust to create the mottling on the bodies as well as their expressive lips frozen in joyous, stern or crazed expressions.  I loved them!!  I was inspired to do a little Tim Burton lighting effect with an old strand of holiday lights shot on a black background.  I ended up having a lot of fun with these guys and I think you will too.

Pardon me for a moment…it's time to check on the steamed pudding once more.  I'm updating the cooking  method used in my cousin’s great-grandmother's recipe, I’m steaming it in a large soup pot on the stove instead of in an old kettle placed on a stone in the middle of a roaring fire…the recipe is quite old.  It’s important to maintain a certain amount of liquid in the pot; it should come halfway up the side of the mold during the 3 hours of steaming time.  I find it handy to keep a teakettle on another burner and periodically bring water to a boil and pour it into the pot to maintain the water level.

The snow is really coming down outside.  I think they were forecasting our first “blizzard” of the season and I don’t mind since it’s only a day after Christmas.  It helps keep the festive mood alive.  Now where were we, oh yes, deranged gingerbread.  Again, I can never seem to find the exact recipe online for the Gingerbread Men.  This is another Martha Stewart’s Baking Handbook recipes and I’ll reprint it here because I really like it…it’s hard to find just the right gingerbread recipe and I think this one is it because of the fresh grated ginger:

Gingerbread Men

3 1/2 cups all-purpose flour, plus more for dusting
1 1/2 teaspoons baking soda
1/4-teaspoon salt
1 1/4 teaspoons ground cinnamon
1 1/4 teaspoons ground ginger
1 1/4 teaspoons ground allspice
1/4-teaspoon ground cloves
2 sticks unsalted butter, room temperature
3/4 cup granulated sugar
3/4 cup packed dark-brown sugar
1 tablespoon plus 1 teaspoon grated, peeled fresh ginger
1 large egg
1/4 cup unsulphured molasses
Royal Icing

In a large bowl, whisk together flour, baking soda, salt, cinnamon, ground ginger, allspice, and cloves; set aside.

In the bowl of an electric mixer fitted with the paddle attachment, beat butter, both sugars, and fresh ginger on medium speed until light and fluffy, 2 to 3 minutes, scraping down the sides of the bowl as needed.  Beat in egg and molasses to combine.  With mixer on low speed, gradually add the flour mixture, beating until just incorporated.  Turn out the dough onto a clean work surface.  Divide in half, and shape into flattened disks; wrap each in plastic.  Refrigerate at least 1 hour or overnight.

Preheat the oven to 350 degrees, with racks in the upper and lower thirds.  Line two large baking sheets with parchment paper; set aside.  Remove dough from the refrigerator, and let stand until slightly softened.  (This will help keep the dough from cracking when rolled.)  On a large piece of parchment paper lightly dusted with flour, roll out dough to about 1/4 inch thick.  To prevent sticking while rolling, occasionally run a large offset spatula under dough, and add more flour.  Place parchment paper and dough on another baking sheet; freeze until very firm, about 15 minutes.

Remove dough from freezer; working quickly, cut out with large cookie cutters.  (If the dough begins to soften too much, return to the freezer for a few minutes.)  Using a wide metal spatula, transfer cutouts to prepared baking sheets; chill until firm, about 15 minutes.

Bake, rotating sheets halfway through, until cookies are crisp but not darkened, 12 to 15 minutes.  Transfer parchment and cookies to a wire rack to cool completely.  Decorate as desired with Royal Icing, if using.

I found decorating with a combination of the royal icing and sanding sugar made for a pretty flocked effect.  The key to getting the look you are after is to decorate in steps.  I first did they white icing and let it dry before using the colored icing.  With the colored icing still wet, the sanding sugar sticks to it, but doesn’t stick to the dried white icing.  It’s a lovely and simple technique and I was very pleased with my gingerbread psychopaths in the end.  

Having done all the cookies on the same day, similar to the way that all 3 spirits visited Scrooge in one night, I was done with my cookies and ready for presentation and gifting!  I love the packaging aspect of the holidays.  I really get into present wrapping and ribbons, and this applies to making the cookie packages as well.  This year I used simple cookie packages I found at the store with decorated cardboard bases and plastic bags.  With the colorful cookies inside, a homemade ornament and a brightly colored ribbon to complete the look I can’t think of anyone who wouldn’t be happy to get one of these presents.  The best thing is that the only money spent is on ingredients, and the gift only requires time spent doing something I already love…primarily baking.

I ended up making about 14 dozen cookies this year.  Many went to packaged gifts, quite a few to work and the others were kept for a Christmas Eve party we had at our house this year.  It was a small gathering of Ossining families and our friend Kassi came up from the “big” city.  It was such a different experience because there were babies here!  Both Finn and Mia were here with their parents, excitedly looking around at the Christmas tree and colored packages hanging out underneath.  It got me that much more excited for our daughter to get here. 


It’s been pretty crazy because Siena could come at any time.  Her due date is January 11th, but she could decide to come at any moment now.  My goal was to get through the holidays (and all it entails) before she came and so far so good (as if I have any control over that).  I really hope she doesn’t come until January because of the proximity to Christmas.  I know there are many folks out there who have birthdays close to the holiday and feel like it takes away from their other special day. 

It’s strange to have Christmas Day over and done with.  So much planning and activity go into making the day special…so much decorating, wrapping, buying and baking that seems like it will never end…and suddenly it’s done and we’re left with a beautiful memory and a sense of loss mingled with exhaustion. 


Christmas Eve is my favorite day of the year, purely because anticipation is at it’s highest.  On Christmas Eve everything is still possible.  Santa may still bring you that special present, the dinner and desserts are still in a beautiful creative place in your mind and all the gifts you are giving are still the best ideas ever.  I’m a big fan of anticipation because before the special moment or day arrives anything is possible and in that possibility is every hope imaginable.

We’ve been living through a lot of anticipation lately waiting for the baby to arrive.  Lots of people asking if we are excited, which seems appropriate, but the honest answer is we are just ready to be done with the waiting.  Whether it’s excitement or nervousness at this point I’m ready to stop speculating on what it’s like to be a parent and see what it feels like.  I’m ready to be out of my thinking brain and into feeling and doing.  It’s sort of like being at a cookie buffet that’ isn’t quite set-up.  I’m ready for it to be done so I can eat already!!!  Maybe a bad analogy because I don’t want to eat my young, but if you’ve had kids I think you know what I’m saying.

So now I will sit and let the steamed pudding come to fruition.  It has one more hour of cooking in the pot before I dare to release the lid of the mold…always a scary thing.  Steamed puddings are difficult only with regard to getting them out of the mold in one piece.  You absolutely must, must, must thoroughly butter the inside of the mold and then spray it with vegetable spray to boot.  This really ups your chances of getting it out with all the details intact.  So I will leave you with one last recipe for the Christmas holiday, one that came from (as I mentioned earlier), my cousin’s great-grandmother, Mrs. Henson.  The only special equipment you’ll need is a steamed pudding mold and a large stockpot, unless you have a stone hearth with which to get a good roaring fire going and a giant lidded cauldron.  The recipe is as follows: 

Steamed Christmas Pudding

1 stick butter (at room temperature)
1 1/2 cups brown sugar tightly packed
2 eggs
1-teaspoon vanilla
1 cup peeled grated carrots
1 cup peeled grated apples
1/2-cup raisins
1 cup coarsely chopped pecans
1 cup sifted flour
1-teaspoon baking soda
1/2-teaspoon salt
1/4 teaspoon Chinese five spice powder (my addition)
1/4-teaspoon allspice (my addition)
1/4-teaspoon ground cardamom (my addition)
1/4 teaspoon freshly grated nutmeg (my addition)
1 cup dry fine white bread crumbs

Sift together the dry ingredients:  flour, baking soda, salt and spices in a medium sized bowl. 

Combine the butter and sugar in a stand mixer; beat on medium high for 3 to 4 minutes.  Add in eggs one at a time followed by the vanilla.  Slowly add dry ingredients and mix until just combined.  Add carrots, apples, raisins, pecans and breadcrumbs.  Mix on low until everything is incorporated.

Pour the batter into the prepared mold (severely buttered like I mentioned earlier) and put the lid on top.  In a large stockpot, place a steamer insert in the bottom and top with a dishtowel.  This will make a cushiony place for the pudding mold to sit while it’s steaming.  The goal is to have the simmering water come halfway up the side of the mold, so depending on the size of your pot, the amount of water you need will vary.  The goal is to bring the water to a boil, place your mold down in the pot on the dishcloth (water halfway up the side) then place a plate or some other dish on top of the mold to weigh it down.  Put the lid on the stockpot and let it simmer for 3 hours.  About every hour or so check the water level, and if you need more boil some in a tea kettle so you are adding hot water and not reducing the temperature of the water inside the pot.  Once three hours are up, cross your fingers that you used enough butter in the mold and you will be rewarded with a beautiful pudding for your Christmas, Boxing Day or New Years Party.

I realize there are a lot of recipes in this blog installment, but I’m hopeful one or more of them will spark your interest not only for Christmas (aside from the gingerbread) but for other times of the year as well.  All of them make wonderful winter treats your friends will love to eat and share, and that’s really what this time of year is all about.  All of these things we do in the name of Christmas or other winter holidays is in service to seeing and celebrating with friends and family.  It’s the ultimate reason I create Fabulous Pastries and hope that everyone enjoys them. 

I’m not sure when I’ll be able to give birth to another posting.  It could be next week or a couple of months from now depending on when Siena decides to make her appearance.  Until then I hope you all have a wonderful holiday season, a happy New Year and a kitchen full of sugar laced memories.  It’s just who I am.